Non ho i punch di Martha Stuart per decorare i cerchi (a dire il vero ho pochissimi punch!), però ieri su youtube ho visto un video che mi ha insegnato come si possono usare i normali punch per fustellare i cerchi tutto attorno, in modo abbastanza regolare.
Nel
video la scrapper usava i punch angolari, mentre io ho voluto provare con quelli normali; il risultato è diverso, sicuramente meno elegante, ma comunque non è male.
Ho approfittato del cerchio realizzato per fare questa specie di grande tag, che diventerà un calendario da appendere, perchè il risultato di quest'improvvisazione mi ricorda lo scorrere del tempo: devo ancora aggiungere in fondo un piccolo calendario mensile con le misure adeguate, che stamperò direttamente al computer.
In pratica, basta avere il disegno di un cerchio diviso in settori circolari (io l'ho scaricato da internet, ma si può anche disegnare con un goniometro e il righello); ci si appoggia al centro il cerchio che si desidera decorare con i punch e si tracciano alcuni diametri, aiutandosi con il righello, in modo da suddividerlo in parti uguali. Poi si usano i diametri tracciati come riferimenti per punchare tutto attorno. Tutto qui.
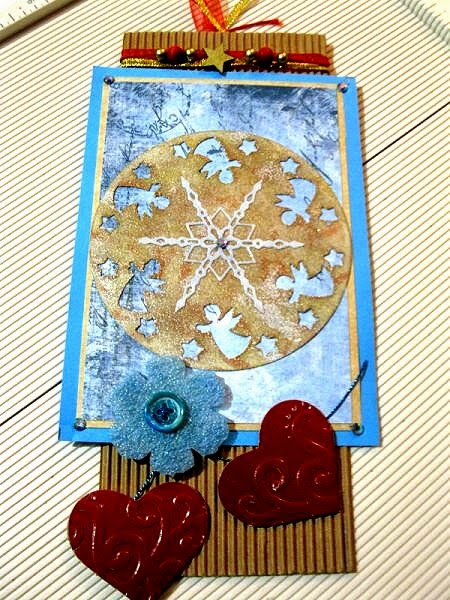
Per colorare il mio cerchio punchato ho usato i tamponi di inchiostro oro, argento e bronzo, poi ho embossato con la polvere clear e l'effetto ottenuto mi piace molto. Ho embossato con la polvere clear anche il fiocco di neve, dopo averlo tamponato con un azzurro molto chiaro (in foto non si vede...)
In alto ho messo un nastrino rosso e oro, con una stellina e due perle dorate. Il fiore azzurro è
fatto con il polietilene, mentre i due cuori sono fustellati da uno scatolone del supermercato con la Big Shot e una fustella Bigz, e poi embossati a freddo.
Ho incollato il cerchio su un foglio di carta scrap della Stamperia, poi il tutto su un cartoncino color kraft che ho ricavato da una scatola del budino... Poi ancora su un cartoncino azzurro e per finire su un cartoncino ondulato più stretto.


9 commenti:
This is a gorgeous card using the most gorgeous of punches with super lovely results....x
{The Journey is the Start – my personal blog}
This is so very clever of you to stretch your punches for other uses! I love all the elements of your design, especially the felt flower!
Brava!!!! Sei stata davvero creativa e grazie per la condivisione!!!! :-DDD
Anch'io ho diversi punch piccoli che non so mai come usare...... ;-)))
Kisssssssssssssssssssssssssss
How very creative and the punches make a very pretty border and I always like the lovely texture the corrugated gives.
B x
Wonderful! Great use of punches. I love all the details on your creation especially the embossed hearts and flower. Thank you for tutorial on how you made it. Debra x
This is so beautiful!! I love how you used your punches!! The embossed hearts are so pretty!! Love this!! Have a great day :)
Lisa
A Mermaid's Crafts
That's a great tip for using punches. I've got some punches, angels, hearts and tulips that I haven't used in years, I think I should get the dust off them and try your technique!
I love the aged look you've given the punched circle, a really great effect. The whole project looks fabulous finished!
I also wasn't to thank you for all the lovely comments you leave me. I read them all and find your kind words very inspiring, so thank you!
This is so neat how you made this with the punches! I clicked on the link to check out the video - I have not seen anything like this before! I think your tag/calendar is gorgeous and I love the gold with the blue and the corrugated backing! The little flower and hearts are a nice touch! This is really different and fun - love it!
Gorgeous creation, fabulous textures and love how you have used your punches, very clever.
Thanks so much for the lovely comments you have left me on my blog :)
Wendy x
Posta un commento